A TALE OF
TWO EIGHT FREIGHTS.
Two
modellers build a pair of Tower Collection Stanier 8F 2-8-0’s in ‘O’ gauge.
Background to the builders.
Two
modellers with very different levels of experience set out to build a pair of
heavy freight locomotives. Warren
Haywood is a highly experienced modeller, over the last few years he has built
over 50 gauge ‘O’ locomotive kits and prefers D.J.H., Tower Collection and
Gladiator. His work has been featured
in a number of articles and can frequently be seen at exhibitions. Steve Lewis is a relative new comer who has
only built three locomotives so far. He
cut his teeth on the Tower Collection Class 02 diesel kit, which was designed for beginners and was
encouraged by the results. He went on
to build a Class 20 and a Class 47 but decided it was time to try a steam
outline locomotive. Egged on by Warren
he dived in at the deep end and bought a top of the range kit. This article
details the pairs experience with the kit.
History of the prototype.
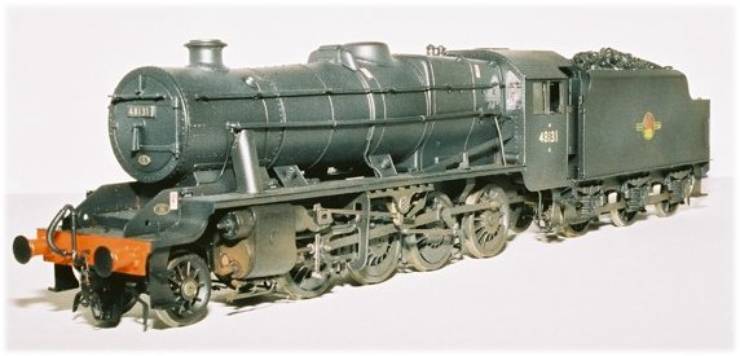
The 8F 2-8-0 designed by Stanier and introduced in 1935 was the first modern locomotive of this wheel arrangement to run on L.M.S. rails. Fowler had produced 2-8-0’s for the S.D.J.R. earlier but the 8F was a far more successful type. So much so that a total of 852 were built including a batch for the War Department, many of which saw service overseas. After the war 666 of the class operated on British soil making it the largest Stanier Class. Many of the class remained in service until the sixties.
Background of the Kit.
The
Tower Collection 8F kits come with a
choice of riveted or welded tenders.
The riveted version will cover locomotives 8146-8225, 8264-8285,
8400-8429, 8500-8559 and 8730-8772 a total of 235 engines. The welded tender version will cover
locomotives 8301-8399, 8430-8479, 8490-8495, 8600-8729 and 48775, a total of
286 engines. The information given here
is as built but it must be remembered that in later life many locomotives
swapped tenders so if a particular locomotive at a set date is required then
obtain photographic evidence. Both kits
are based on the long firebox version with the choice of Stanier tenders. For reference see “Stanier 8F’s at work” by
Alan Wilkinson, published by Ian Allen.
Contents of the kit.
The Tower Collection 8F is complete except for wheels, motor, gears and couplings. The body consists of a three piece cast pewter firebox / boiler / smokebox assembly with the cab, tender and footplate supplied in etched brass. Pewter castings are supplied for chimney, dome, cyclinders, axleboxes, buffer beams etc. The chassis is mainly etched brass. Fluted nickle silver valve gear is supplied in conjunction with a mixture of etched brass and lost wax cast brass parts to complete the motion. Sprung buffers, vac pipes, handrail knobs etc are all supplied with the kit.
Extra parts required.
Both
modellers chose Slaters wheels and plunger pickups and Tower Models sprung
screwlink couplings. Warren used a
Slaters GB03 spur-drive gearbox motor.
Steve used a D.J.H. gearbox motor based on a Mashima 1833. (Please note the larger D.J.H. OGDC2 based
on the Buehler motor is too large to fit into the firebox). The only other items needed were low melt
solder, 145 degree solder, two part epoxy, superglue, flux, paint and
transfers.
First impressions.
Steve
ordered his kit and parts by mail order.
The kit was ordered over the phone and good to their word Tower Models
had it delivered the following day. The
kit arrived packed in a strong plain brown card outer wrapper. Once removed the kit box itself was found to
be a large maroon box. On opening the lid the contents were beautifully packed
in foam, the major castings all wrapped in corrugated card, the smaller parts
being vacuum packed in clear polythene for easy recognition. There appeared to be no trace of the main
etchings but once the foam was lifted out of the box the etchings were found to
be safely all wrapped up at the bottom of the box. Steve knew that these were not cheap kits and the quality was
immediately obvious. The care and
attention to detail in the packing, the quality of the castings, a twenty page
instruction leaflet and fourteen pages of illustrations all told the same
story. Steve sat himself down to read
the instructions and study the parts before starting the building process.
Warren
had collected his kit direct from the shop on one of his regular visits. The contents came as no surprise to him as
he had built so many kits from the range before.
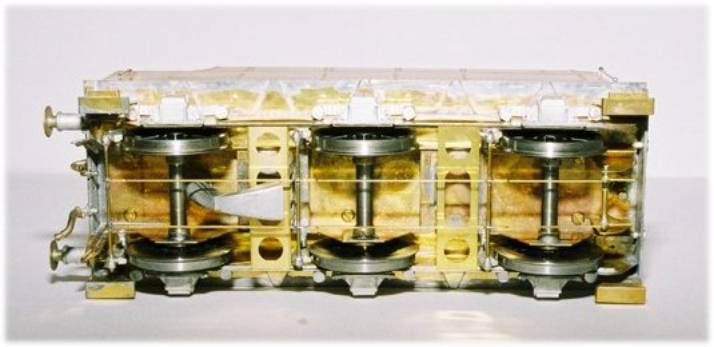
Building the tender.
The
instructions suggest that the tender is built first. This is good advice. The
modeller builds the easy bit first and gets chance to learn the basic layout
and construction method recommended by the manufacturer. The Tower Collection is a range of kits
manufactured exclusively for Tower Models by D.J.H. Engineering. Anyone who has built a D.J.H. ‘O’ gauge kit
will be used to both the quality and the style of build that is the standard
set by the Consett based company.
The
tender chassis is a brass etching. It
is necessary to score and bend up the chassis sides after fitting the
bushes. Small parts such as brake gear
brackets, water scoop hangers and such like are all then soldered in
place. Once the basic assembly is
completed the wheels can then be fitted.
It is important to check for level and ensure the brake shoes once
fitted do not foul the wheels. The
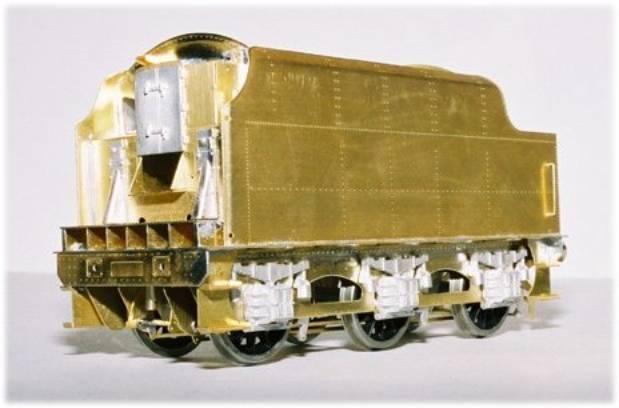
tender body can now be assembled. The
etched brass tender sides are supplied pre-bent which saves a difficult
job. The sides, front and rear are now
all soldered together. A useful tip to
prevent buckling or distortion when soldering is to place a steel ruler flush
with the side and footplate and hold firmly whilst soldering. Once the basic tender body box has been
completed all small parts such as steps, lamp irons, buffers, etc. can then be
soldered in place. Even as an
inexperienced modeller Steve had the tender fully assembled in under six
hours. So far so good. The completed tender was then laid aside so
work could commence on the locomotive.
Warren having built a number of Stanier tenders before had completed the
tender very quickly. As he said the
construction really is simple and the exploded diagrams easy to follow.
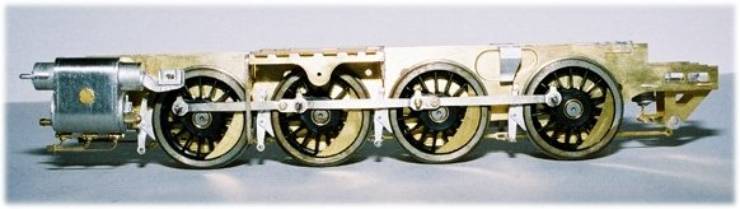
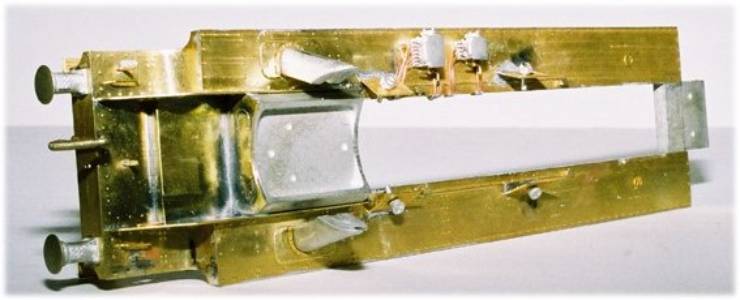
Building the Locomotive Chassis.
Following
the instructions both modellers started by laying out the frames. The axle bushes are soldered in place along
with the spring details. The Slaters
plunger pickups were fitted in place and the driver axles inserted. The gearbox motor needs to be fitted at this
point and must be fitted on the third axle with the motor going vertically up
into the firebox. Next the wheels were
fitted and checked for free running.
The brakes were then soldered in place and care taken to avoid fouling
the wheels.
The
pony truck is a brass etching and needs to be folded up, being careful to
ensure it is kept square. The wheels
are then fitted and the complete unit laid aside.
Returning
to the chassis the motion brackets are then soldered in place. With all his experience Warren disregarded
the instructions and fitted the motion brackets before he fitted the wheels.
Once in place the wheels cannot be fitted.
He had to unsolder the motion bracket to fit the leading drivers. This
is a point worth remembering.
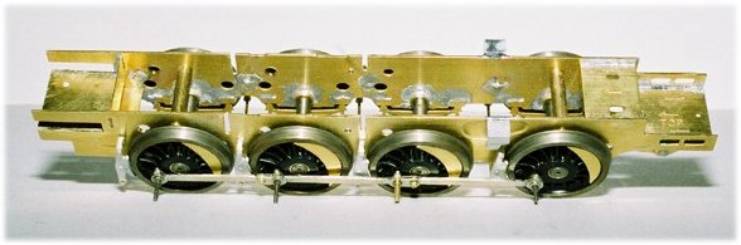
Both
modellers found it easier to concentrate on completing the valve gear on one
side at a time. The coupling rods need
to be laminated as do the connecting rods.
It is necessary to tap the return cranks 12BA. This came as a surprise to Steve and delayed production for a
couple of days whilst he obtained some taps.
Sensibly he also obtained a
supply of small drill bits. A quantity
of drills 0.8 / 1.0/ 1.1 / 1.2 / 2.0mm are essential and most modellers know how easy it is to break small drills.
The
assembly of the valve gear is fairly straight forward but does take time and
care. As each section is assembled and
fitted it is necessary to check it all moves freely. A little oil should be applied once the assembly is completed. With the motor now wired to the pickups the
locomotive can now be given its first test run. Look for any possible shorts or any parts fouling each
other. Steve spent several hours making
minor adjustments and corrections before he was finally happy with the running. Work can now start on the body.
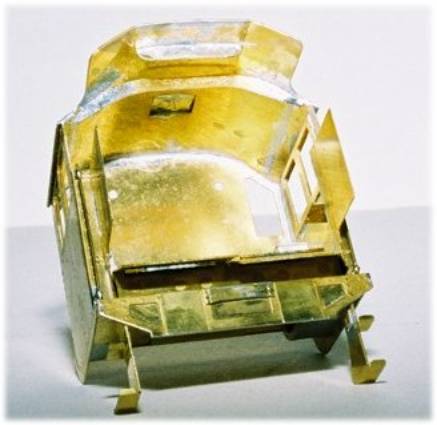
Assembling the locomotive body.
The
cab is assembled first. The roof is
supplied pre-bent. The basic box of the
cab is soldered up. The backhead is
assembled separately and fixed into place later. It is a good idea to paint the backhead before fitting in the
cab. It can be glued into place with
epoxy resin later. The buffer beam
assembly can now be completed and set aside.
There are options here so time to check some prototype photographs. The footplate can now be assembled but
ensure the brass etching is flat and level.
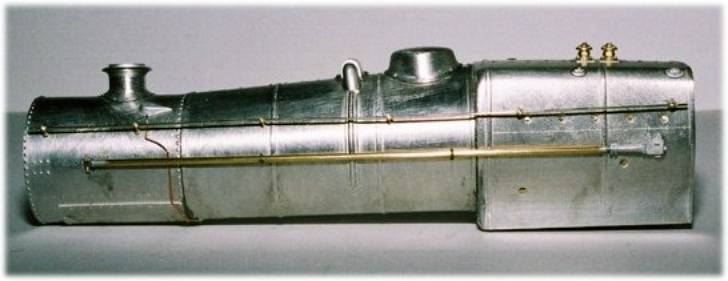
The pre-assembled cab is then soldered onto the footplate. The large pewter castings that form the
smokebox, boiler and firebox can now be cleaned prior to assembly. The basic fit was found to be excellent and
details such as chimney, dome etc can be fixed in place. From now one it is just a bit of a slow job
adding all the additional detail such as handrails, pipework etc. Warren had taken about 30 hours to get the
locomotive to the fully built but unpainted stage. Steve reckons it had taken him more than 100 hours.
Before
painting the locomotive it should be completely re-assembled and track
tested. For painting the body of both
the locomotive and tender are separated from the chassis.
Painting and lettering.
Both
modellers cleaned up all parts for painting using soapy water. This is to help kill any flux still on the
metal. Afterwards rinse the parts and
allow to dry. Steve used Halfords car undercoat in a spray tin to undercoat his
locomotive. Warren has an airbrush and
so normally uses Railmatch paint. However, he too used Halfords undercoat. Steve used Railmatch black in a spray can to top coat the model
and also Railmatch matt varnish once the locomotive has been lettered. Warren sprayed his 8F with Halfords satin
black paint. Both modellers used H.M.R.S.
sheet 14 B.R. locomotive lettering and insignia for both the crests and
numbers. Warren used his airbrush to
apply a weathered effect. Finally he
topcoated the locomotive with a 50/50 mixture of Ronseal supertough matt and
satin varnishes. A slight overspray of
weathering was then applied with the airbrush.
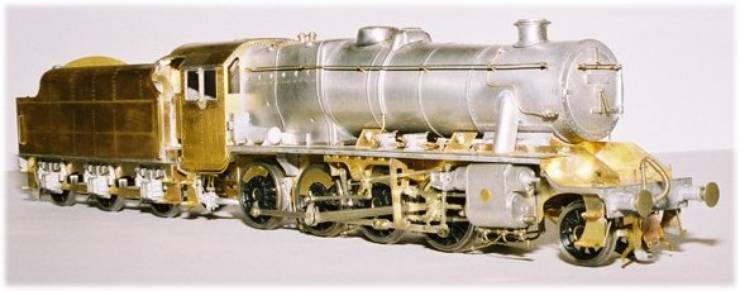
Conclusions and criticisms.
Modellers are often quick to criticise and slow to praise. However, both Steve and Warren could not fault the finished models. They both appeared totally accurate and do allow for a number of variations. Neither locomotive had a single missing part. Nothing was damaged in the box attesting to the quality of the packing. The build can best be described as straight forward but slow. There was no need for anything other than minor cleaning up of the cast parts and very few items had any flash. The quality of both the etchings and the lost wax castings was extremely high. Warren with his wealth of experience claims that this is the best kit in either the D.J.H. or Tower Collection ranges.
Steve made the valid comment that although there are plenty of illustrations he felt as an inexperienced modeller that more details in the construction notes and even more exploded diagrams would be helpful. He suggested that some of the assembles could be dealt with in more detail, especially the section on valve gear. Despite this Steve is extremely pleased with his finished model and considers it well worth the expense and effort.
| Click Here to Return to the
|